Saturday, June 1, 2013

Be Our Guest

How long does it take one to post pictures of their new house? After moving into our new home back in February I'm just now taking the time to put pictures and floor plans up.

Welcome to our new home...

Living Room, looking to the Foyer

Living Room, looking to the Patio

Family Room

From the Family Room looking into the Kitchen and Breakfast Nook. So Glad the Terra-cotta floors are gone!

Kitchen.  Next big project after the upcoming built-ins is to refinish the cabinets.

Laundry Room

Dinning Room

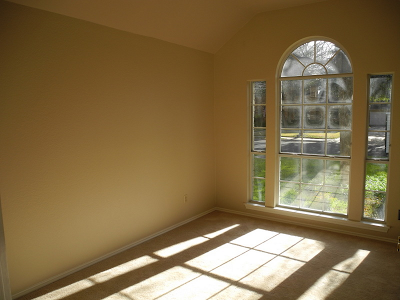
Bedroom #1 - Office

Bedroom #2 - Guest Room

Hall Bath

Master Bedroom

Master Bath

Look at that glorious shoe storage!!!

Exercise Room

Backyard and Deck, perfect site for a future Hot Tub!

Looking at all these pictures now it makes me want to work on a project...off to finish my kitchen table!


Wednesday, May 1, 2013

Build-A-Birdie


Are you ever too old for stuffed animals?  I think not! My "Best Friend" was made this weekend when I went to a Build-A-Bear Workshop.  The best part about my new bear...she was FREE!

While walking around the mall, my sister and I decided to go into Build-A-Bear to see what it was all about.  I had never been into a Build-A-Bear workshop before and have been wanting to make one for years, but what 28 year old goes into a Workshop to build a bear without a child in tow? While we were looking at the wall of unstuffed animals, a Bear Builder (that's what I am calling him) came up to us to see if he could help. I told him that I was just looking at the options they had for bear building because I have been wanting to make one for years and that Building-A-Bear was on my "30 Before 30" list.  Not prepared to actually Build-A-Bear that day he threw me off guard when he said he would give me a bear for free! Who am I to turn down a free Bear?

Step #1 - Choose Bear and begin to build


Step #2 - Proceed to Fill 
Step #3 - The Heart Ceremony. Yes, I rubbed a silk heart on my body so my bear could possess qualities like mine!

Step #4 - Insert your Bears heart
Step #5 - Dress and name your new Best Friend...Birdie Thirty was born on 4/27/13.

After the birth of Birdie I went to the cash register to pay for the outfit I dressed her in.  The Bear Builder checked me out an proceeded to give me Birdie's outfits for free too! You rock Bear Builder!
So just in case Seth MacFarlane's tale of a child's stuffed animal coming to life is true...I can't wait to be your Thunder Buddy Birdie!


Wednesday, April 10, 2013

Anniversary Gifts by Year

April 21, 2007...The day I married Trevor!  As our first anniversary approached us the following year I already knew what I was going to get him, well kind of.  I have always known that every anniversary has a traditional gift to give your spouse and I knew that I wanted to follow the traditional anniversary gifts as long as I could, and I have.

I will admit there is one slight issue with giving the traditional anniversary gifts...it's not easy.  I'm not sure how old the list is, but it doesn't tell you exactly what to go buy.  If only the list was a little more straight forward and it said TV, new bike, or what my husband is thinking but won't tell me (now that would be helpful). Instead it has things like cotton, leather, and wood; what am I supposed to do with that?  Luckily I have a year to think about these things! The list of traditional and modern anniversary gifts can be found HERE.

As my sixth anniversary is fast approaching I thought I would share the last five years of anniversary gifts I have given my husband.

FIRST ANNIVERSARY - PAPER

Plane Tickets and Pictures

We knew that we wanted to go on a trip for our first anniversary so we purchased tickets to Costa Rica.  We spent two weeks backpacking the country, it was an awesome trip.  Nowadays though you don't get paper tickets any more, so I threw in a little something else...I took abstract pictures of my husbands work truck and printed them out and framed them.

Zip Lining in Costa Rica

Costa Rica Beach Manuel Antonio
Pictures I took for the Hubs

SECOND ANNIVERSARY - COTTON

Concert tickets wrapped in a T-Shirt

What in the world do you buy a man that is made of cotton? Especially that could be an anniversary present! This one took some thinking.  I purchased concert tickets to one of my husbands favorite bands that was coming to town and wrapped them in the bands t-shirt.


THIRD ANNIVERSARY - LEATHER

Baseball and Baseball Tickets

If only we would have gotten married in October or November...FOOTBALL!!! I still love baseball though, it's America's favorite pastime, and games are always fun to go to.


FOURTH ANNIVERSARY - FRUIT & FLOWERS

Boudoir Photography

Instead of being literal with this anniversary I spiced it up a bit! I took Boudoir photos that incorporated fruit and flowers into them.  (Photography by the wonderful Sherry Hammonds)

Fruit...

and Flowers!

FIFTH ANNIVERSARY - WOOD

Tree and Wood Coupon Book

Due to a bad drought we had the previous year our magnolia tree we planted the first year we bought our house ended up dying.  So this anniversary worked out perfect for me when I went and bought a Chinese Pistache and had it planted in our back yard.  Hanging around the tree I also made a wooden coupon book for the Hubs with things like dinner of his choice, a free massage, etc. 


SIXTH ANNIVERSARY - IRON

TBD
*Nice try Trevor*


Saturday, March 9, 2013

Moving Postcards

What do you do on a dreary Saturday when you're sick?  Why catch up on your correspondence, that's what!  Man, I sound like someone in a Jane Austen novel.

After moving into a new house a question is presented of how to get your new address out to your friends and family.  Instead of making the impersonal text message, email, or Facebook post why not mail out your new address.  Plus who doesn't love getting stuff in the mail?

This is the second house that I have made my "New Address/Moving Postcards" and I just love them!


Making them is simple enough since after just moving you should have most of the supplies to make them.

Supplies Needed:
Cardboard
Boxcutter
Fine Point Sharpie
Fragile Packing Tape
Postcard or Measuring tape
"New Home" Stamp (optional) 

First things first, cut up your moving boxes.  What I normally do is cut the closing folding flaps off (technical term), they make for good size and make for less cutting later on.


After cutting off the closing folding flaps of the boxes you will need another postcard for size comparison of just the measurements of a standard postcard, which is 4x6.  Then cut each postcard to size with the box-cutter on a hard surface and use an extra piece of cardboard as a mat.


Now I didn't exactly have the fragile packing tape when I moved so I had to go find it.  If you are like me and didn't use it either, here is a tip for finding it to purchase...UHAUL!!!  I went to seven places before finding it, I thought I should share. 


On the back side of the postcards place the tape and cut off the excess with a box-cutter. 


Since on postcards there is no need to write a return address make sure to include your new address with your name as well so your recipients know who it is coming from.  Also, the thickness of these postcards do not qualify to ship at a postcard rate with the USPS, so a first class stamp (forever stamp) is needed.  

Now the only thing left to do is move so you can make these!


Friday, February 8, 2013

Music to Art

So I discovered if I want to write "how to" blogs I need to have a better documentation of pictures, OOPS!

After replacing and refinishing the dresser for my guest room I felt compelled to give the room more of a facelift.  What better way to do that than with new art for the walls! Not wanting to spend a lot for new art I decided to make a piece instead.


After a long hunt for a large frame that didn't cost an arm and a leg I found this one at JoAnn's Fabrics for $20, SCORE 75% off!

SUPPLIES NEEDED:
Frame ($20)
Old Hymnal/Sheet Music ($1-Thrift Store)
Stencils ($2.99-Hobby Lobby)
Paint (Already Had)
Mod Podge (Already Had)
Stencil Sponges ($1.99-Hobby Lobby)

TOTAL: $25.98

Warning: This project may cause you to sing hymns all night long!
After selecting the hymns from the hymnal and ripping them out (I liked the ripped texture better) I placed them on top of the preexisting art piece once removed from the frame to reuse the cardboard.  After strategically placing He Arose and Majesty, among others, I Mod Podged (is that a verb?) the hymns into place and sealed them with Mod Podge as well.  After allowing the Mod Podge to dry I laid the stencils on top of the hymn and began to paint with the stencil sponges.  After fully drying I placed the art piece back into the frame and TA DA!


I love how it turned out!  The glare in these pictures is awful, this is even with the blinds closed and lights off!

Thursday, February 7, 2013

So long Particle Board!

Eurway...IKEA, same difference!  So when your goal is to replace all your IKEA (aka falling apart furniture) where do you start?  How about the dresser that stores nothing! The particle board drawer bottoms had fallen apart years ago and was not fixable due to the way the dresser was constructed.  We had tried to fix it once by attempting to gorilla glue the drawer bottom back into place, that fix lasted maybe a week before it broke again. Solution...replace it!!!

Now I could have gone to a furniture store and bought a new dresser, but where's the fun in that?


I found this solid wood dresser on Craigslist for $70.  The top was in rough condition, it didn't have drawer pulls, and it needed wood filler in numerous places; all things I could fix especially since I loved the lines of it.


With a little love, I mean mouse sander and elbow grease, I think my new dresser turned out great!  So long particle board dresser!


I'm thinking kitchen table next...

Much Love,
Amanda


P.S. I think I said Particle too many times in this post, so They Might Be Giants' Particle Man is now stuck in my head.  Now let it be stuck in yours...


Saturday, February 2, 2013

Thrift Shop Challenge

Go to a thrift shop and spend $20, you don't have to tell me twice! Thanks Young House Love!

This shopping trip to Goodwill excited me because of the challenge itself since I love the song; but what excited me more was that this was my first shopping trip to hunt for new decor items and projects for my new home :)

And what is the challenge you might ask...

Step One: If you have yet to discover the awesomeness that is Thrift Shop by Macklemore & Ryan Lewis, watch video
(Warning: Explicit Version)

Step Two: Accept Young House Love's Macklemore Thrift Shop Challenge

Step Three: Go to Thrift Shop

With $20 in my pocket, I popped some tags!!!! :)

Step Four: Find items referenced in the Song
How about an all pink rack of all pink!

Double Score! Moccasin house slippers

A rack of big a$$ coats!

Step Five: Show off my spoils!
Some new lamps for the new casa, they need to be vamped up a little though

I didn't go into Goodwill thinking that this trip would be any different, I came out with a book, a dvd, and a LP!

Thanks Young House Love for the enjoyable challenge at the Thrift Shop!

Much love,
Amanda


Related Posts Plugin for WordPress, Blogger...